
How to Build a Backyard Wood Deck
Construct a sturdy ground-level or raised wood deck from footings and structural framing to securing joists, laying decking boards, and trimming edges cleanly.
Lay out and square the deck first, dig footings below the local frost depth, set posts and beams, frame joists at the planned spacing, then install decking with consistent drainage gaps.
Plan the deck before you cut anything
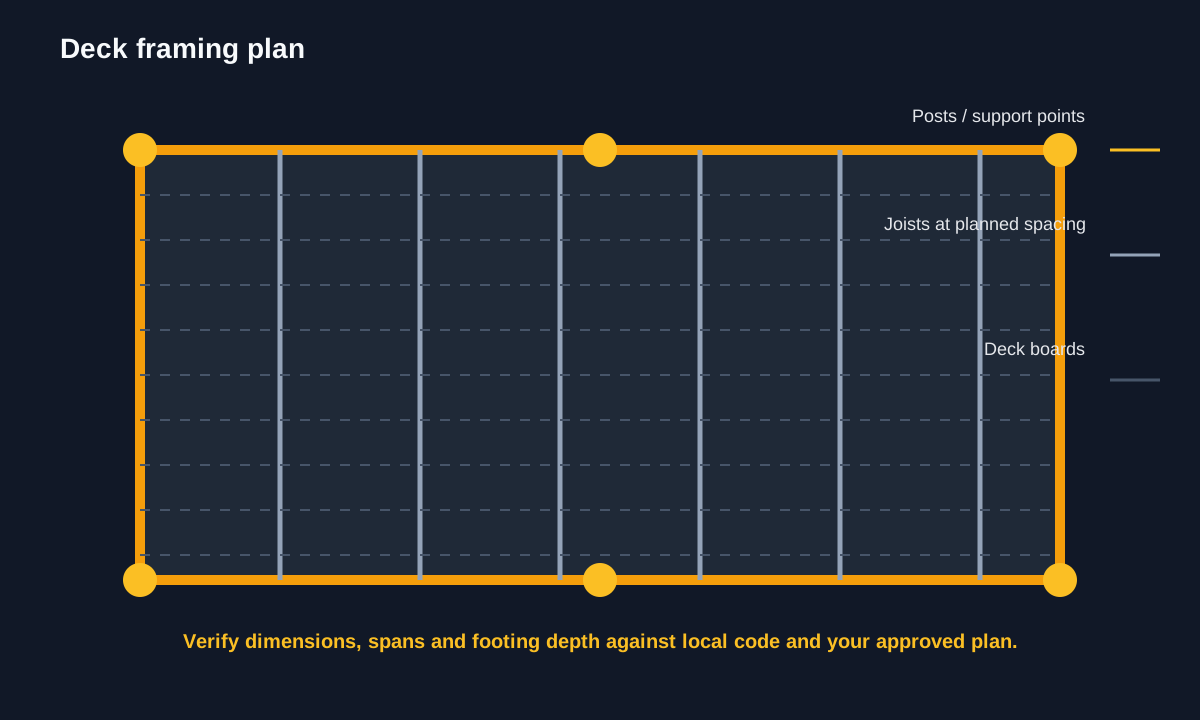
Use this visual plan and rough material estimator to sanity-check your layout. It is a planning aid, not a substitute for an approved plan, local code or manufacturer instructions.
Rough material estimator
Estimates use 5/4x6 boards, a 3/16-inch gap, 10% waste and do not include stairs, railings, beams, footings, fasteners or site waste.
Correct build order
- Confirm dimensions, utilities and local requirements.
- Lay out square and set the support points.
- Install posts and beams level and plumb.
- Frame the rim and joists at the planned spacing.
- Lay decking with consistent drainage gaps.
- Trim, seal cut ends and inspect every connection.
Watch the original demonstration
See the source video before you start, then use the step checkpoints below as your field guide.
Play source video on YouTubeBuild the deck in the right sequence
- Pour Concrete Deck FootingsSet solid support points before framing.
- Dig Post Holes and Frame a DeckLayout, excavation and early framing.
- Frame the Ledger, Beam and JoistsThe structural frame that carries the deck.
- Ground-Level Backyard DeckA simpler alternative when height and access allow.
- Clean, Renew and Seal a Wood DeckProtect the finished surface after construction.
Visual step map
See the full sequence before you start, then check off each step as you go.
0 of 6 steps checked
Materials and cost planner
Select the items you plan to buy, adjust any estimated price, and calculate the selected total.
Editable rough U.S. retail estimates. Estimated all listed: $335.00. Prices are planning estimates, not quotes — tax, store, brand, size and quantity will change them.
Time and finish planner
Estimate active working time from the number of steps in this guide.
Paint coverage calculator
Estimate how much paint to buy from the area you plan to cover, the number of coats and the coverage shown on the can.
Use the coverage printed on the actual product label. Rough, porous or heavily patched surfaces can use much more paint.
- Read the tools, materials, safety notes, and steps below for free.
- Tap See 20-second demo if you want to understand it first.
- Tap Start Camera Coach when you want hands-free help, or Voice-only if you do not want to use the camera.
- Allow camera and microphone. Point your phone at the work; the coach watches your progress and tells you the next step.
🧰 Required Tools & Equipment
- ✓ Post hole digger or auger
- ✓ 4-foot spirit level
- ✓ Circular saw
- ✓ Cordless impact driver
- ✓ Speed square
- ✓ Chalk line
- ✓ Tape measure
📦 Materials & Supplies
- ✓ Pressure-treated 4x4 posts
- ✓ Pressure-treated 2x8 framing lumber
- ✓ 5/4x6 decking boards
- ✓ Quick-setting concrete mix
- ✓ Metal joist hangers and structural screws
- ✓ 3-inch exterior deck screws
⚠️ Safety Checkpoints & Warnings
- • Call 811 before digging to locate all buried utility lines.
- • Wear safety glasses and a dust mask when cutting pressure-treated lumber.
- • Use proper lifting techniques or a second person when setting heavy beams and wet posts.
📋 Step-by-Step Guide (6 Steps)
Lay Out and Dig Footings
Set up batter boards and masonry string lines to mark the deck perimeter. Use the 3-4-5 triangulation method across the string corners to guarantee square corners. Dig post holes below your local frost line at your marked layout locations.
- • Taut string lines forming a rectangle with identical corner-to-corner diagonal measurements.
- • Clean, circular footing holes excavated to consistent depth below frost line.
- • Failing to dig deep enough to clear the frost line.
- • Skipping diagonal measurement checks before digging.
Set Support Posts and Pour Concrete
Place post bases or set 4x4 posts directly into the footing holes. Hold a 4-foot spirit level against two adjacent faces of each post to ensure plumb alignment while adding concrete. Pour concrete around the base, tamp out air pockets, and allow it to cure fully.
- • Posts standing completely vertical on both axes with temporary 2x4 bracing stakes attached.
- • Concrete sloped slightly away from the post base to shed water.
- • Plumbing only one side of the post.
- • Pouring concrete dry without mixing or tamping thoroughly.
Mount the Beams to Support Posts
Mark the top cut-off height on your posts using a level, then trim posts flat with a circular saw. Notch the posts or mount galvanized post-cap brackets to seat your double 2x8 support beams. Fasten the beams through the brackets or posts using structural screws or through-bolts.
- • Beams resting flat inside metal post caps or post notches with no gap under the wood.
- • Spirit level reads dead level across the full length of the beam span.
- • Relying solely on lag screws to hold beams in shear rather than resting beams directly on post shoulders or rated brackets.
- • Failing to crown lumber facing upward.
Install Rim Joists and Field Joists
Attach the perimeter rim joists, squaring the outer frame with diagonal measurements. Mark joist locations at 16 inches on center along the inside of the rim joists. Fasten metal joist hangers and slide the 2x8 field joists into position, securing them with approved structural hanger fasteners.
- • Joists evenly spaced at 16-inch intervals with flush top edges.
- • Every nail or screw hole in the metal joist hangers filled with rated hardware.
- • Using standard drywall or deck screws instead of code-approved structural hanger nails or screws.
- • Uneven top edges creating a wavy surface for deck boards.
Fasten Decking Boards
Lay the first deck board straight along the outer edge, overhanging the framing by 1 inch. Secure each board across every joist using two exterior deck screws driven flush, maintaining a consistent 1/8 to 1/4-inch drainage gap between parallel boards. Stagger end joints across different joists if your deck is wider than a single board length.
- • Uniform 1/8-inch expansion gaps visible between all adjacent boards.
- • Screw heads driven slightly below the wood surface without splitting the grain.
- • Butting wet pressure-treated boards too far apart (they will shrink and create excessive gaps).
- • Driving screws too close to the board ends without pre-drilling, causing splits.
Snap Chalk Line and Trim Overhangs
Snap a single straight chalk line along the wild ends of the deck boards to match your desired overhang. Set your circular saw blade depth slightly deeper than the board thickness and make one continuous cut along the line. Seal all raw cut ends with an exterior end-cut wood preservative.
- • A perfectly straight cut edge across all board ends running parallel to the rim joist.
- • End-cut wood preservative visibly coating all freshly exposed end grain.
- • Setting saw blade depth too deep, accidentally slicing into the framing joists beneath.
- • Wandering off the chalk line during the cut.
Credit: inspired by an original tutorial by KWC Handyman Services — watch the original on YouTube.
Don’t have everything?
- No Post hole digger or auger? Round-point trenching shovel and digging bar
- No Chalk line? Clamped straightedge board and pencil line
Frequently asked questions
What is the first step in building a deck?
Start with layout and footings. Confirm utilities, establish square lines, and confirm footing depth and permit requirements with your local building department before digging.
How deep should deck footings be?
Footing depth depends on local frost depth, soil, deck loads and local code. Confirm the required depth for your exact location rather than using one universal number.
How do I keep a deck frame square?
Use batter boards and string lines, then measure both diagonals and adjust the layout until they are equal.
What gap should deck boards have?
Leave a small, consistent drainage gap and follow the deck-board manufacturer recommendation for the specific material and moisture content.
Do I need a permit to build a deck?
Many jurisdictions require a permit or inspection for decks. Check with your local building department before construction.