
How to Install Fence Posts
Set durable, plumb fence posts using proper hole depth, gravel drainage bases, structural bracing, and sloped concrete collars for long-lasting alignment.
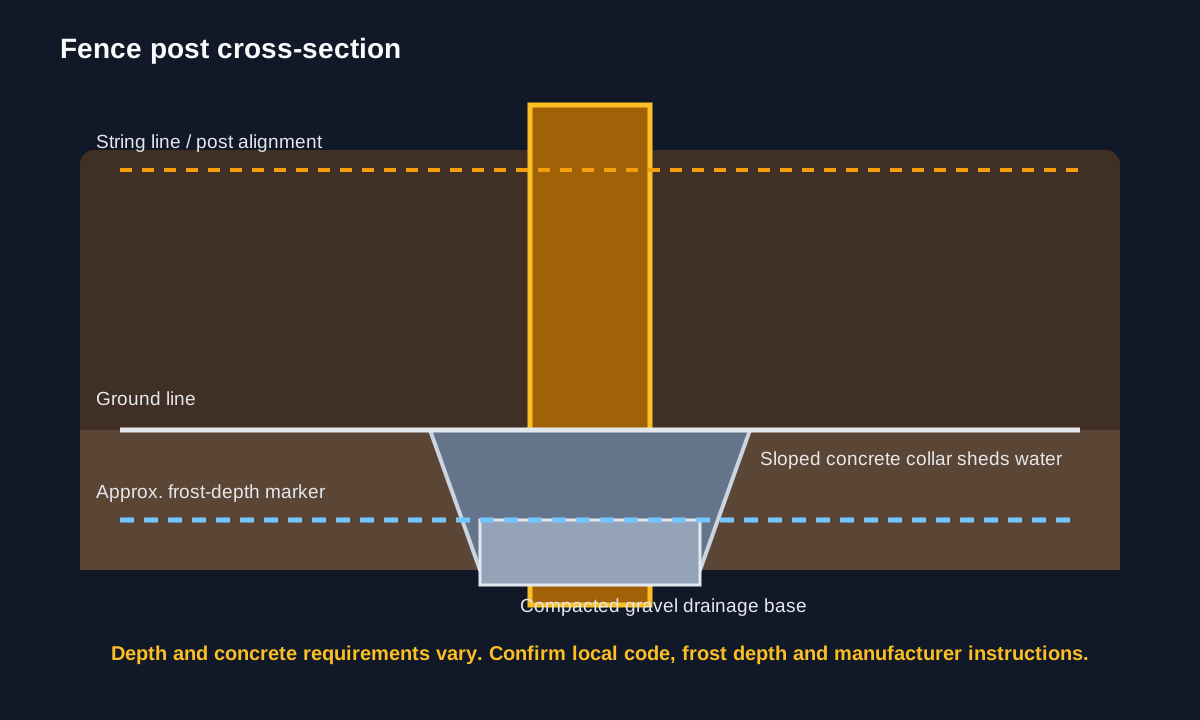
Mark a straight fence line, dig below the local frost depth, add a compacted gravel base, brace the post plumb, then pour concrete with a collar that slopes water away from the wood.
Watch: How to Install Fence Posts
Confirm utilities and frost depth, dig and set the posts, then check plumb before backfilling. · 3:08 minute walkthrough. The full written steps are below.
Set the line, depth and drainage first
The post line, hole depth and water drainage matter more than the concrete brand. Confirm buried utilities and local frost depth before digging.
Post count planner
This counts posts only. Panel type, wind load, gate posts and local code can require different spacing and deeper footings.
Before pouring concrete
- Call 811 and mark buried utilities.
- Confirm the required footing depth for your area.
- Keep posts 1/8 inch off the string line.
- Brace both axes before concrete sets.
- Slope the collar away from the wood.
Watch the original demonstration
See the source video before you start, then use the step checkpoints below as your field guide.
Play source video on YouTubeRelated fence and repair guides
- Fix a Leaning Fence PostDiagnose frost heave, shallow footings and rotted wood.
- Repair a Leaning FenceRepair and re-plumb an existing run.
- Install a Chain Link FenceCompare the process for metal posts and panels.
- Chain Link Fence: Easier MethodAn alternate sequence for a full fence installation.
Visual step map
See the full sequence before you start, then check off each step as you go.
0 of 5 steps checked
Materials and cost planner
Select the items you plan to buy, adjust any estimated price, and calculate the selected total.
Editable rough U.S. retail estimates. Estimated all listed: $290.00. Prices are planning estimates, not quotes — tax, store, brand, size and quantity will change them.
Time and finish planner
Estimate active working time from the number of steps in this guide.
Paint coverage calculator
Estimate how much paint to buy from the area you plan to cover, the number of coats and the coverage shown on the can.
Use the coverage printed on the actual product label. Rough, porous or heavily patched surfaces can use much more paint.
- Read the tools, materials, safety notes, and steps below for free.
- Tap See 20-second demo if you want to understand it first.
- Tap Start Camera Coach when you want hands-free help, or Voice-only if you do not want to use the camera.
- Allow camera and microphone. Point your phone at the work; the coach watches your progress and tells you the next step.
🧰 Required Tools & Equipment
- ✓ Post hole digger
- ✓ Tape measure
- ✓ Post level or 2-foot bubble level
- ✓ Cordless drill and driver bits
- ✓ Shovel
- ✓ Mason line and wooden stakes
- ✓ Wheelbarrow or mixing trough
📦 Materials & Supplies
- ✓ 4x4 or 6x6 pressure-treated wood posts
- ✓ Fast-setting concrete mix
- ✓ Crushed gravel (3/4-inch)
- ✓ 1x4 lumber for temporary bracing
- ✓ 2-1/2 inch exterior wood screws
- ✓ Clean water
⚠️ Safety Checkpoints & Warnings
- • Call 811 or local utility locator services before digging to confirm no buried electrical, gas, or plumbing lines exist.
- • Wear heavy-duty gloves and safety glasses when handling dry concrete mix to prevent caustic skin and eye burns.
- • Lift concrete bags with your legs, keeping the load close to your body to prevent lower back injury.
📋 Step-by-Step Guide (5 Steps)
Establish the Fence Line and Post Locations
Drive wooden stakes into the ground past the end points of your intended fence run. Tie mason line tightly between the stakes, pulling it taut to create a straight reference line. Use a tape measure to mark individual post center points along the ground, usually spaced 6 to 8 feet apart.
- • A tight, straight string line suspended 6 inches above the ground between terminal stakes.
- • Brightly marked spots or ground flags spaced evenly directly beneath or adjacent to the string.
- • Tying the string directly to the post locations rather than beyond them, forcing you to remove the reference line to dig.
- • Allowing the string line to sag in the middle.
Dig Post Holes Below the Frost Line
Dig centered holes at each mark using a post hole digger or auger. Dig down to at least one-third to one-half the total height of the above-ground post, extending below your local frost line (typically 36 to 48 inches). Flare the bottom of the hole slightly wider than the top to create a bell shape that resists frost heave.
- • A clean, vertical hole with straight sidewalls and a slightly widened bottom.
- • A tape measure inserted reads the required depth below local frost level.
- • Stopping short of the local frost depth, causing the post to heave and lean in winter.
- • Making the top of the hole wider than the bottom (funnel shape).
Add Crushed Gravel for Base Drainage
Pour 4 to 6 inches of crushed gravel into the bottom of each excavated hole. Tamp the gravel firmly using the end of a 2x4 or post to create a solid, level footing. This layer allows groundwater to drain away from the bottom end-grain of the wood post.
- • A flat, compacted layer of gray gravel covering the entire bottom of the dirt hole.
- • Omitting gravel entirely, trapping moisture directly against the post base.
- • Leaving the gravel uncompacted, which allows post settlement later.
Position, Plumb, and Brace the Post
Lower the post into the center of the hole onto the gravel bed, aligning its face 1/8 inch off the string line. Attach a post level to two adjacent sides of the post. Secure two 1x4 braces to the post using 2-1/2 inch screws, driving ground stakes to fasten the bottom of the braces once the bubble is dead-center on both axes.
- • Post standing upright without hands holding it, rigidly supported by two angled 1x4 braces forming a tripod.
- • Bubbles centered simultaneously on both adjacent faces of the post level.
- • Bracing on only one side, allowing the post to drift along the unbraced axis.
- • Letting the post physically touch and bend the mason string line out of square.
Pour Concrete and Crown the Top Collar
Fill the hole with fast-setting concrete, alternating dry mix and clean water according to package instructions, or mix in a wheelbarrow and shovel it in. Stop the concrete 1 to 2 inches below the ground surface. Use a trowel to shape the wet concrete surface into a downward slope away from the post face to shed rainwater.
- • Concrete filled within 2 inches of ground level, visibly mounded/beveled downward away from the wood post.
- • Level checked one final time with bubbles remaining dead-center.
- • Filling concrete above ground level into a concave bowl shape that pools water against the wood.
- • Disturbing or removing the braces before the concrete reaches initial set.
Credit: inspired by an original tutorial by The Home Depot Canada — watch the original on YouTube.
Don’t have everything?
- No Post level? Standard 2-foot or 4-foot carpenter's level checked alternately on two adjacent faces of the post.
- No Post hole digger? Narrow trench shovel and heavy steel digging bar (spud bar) to loosen soil.
- No Fast-setting dry-pour concrete? Standard concrete mix pre-mixed with water in a wheelbarrow before pouring into the hole.
Frequently asked questions
How deep should fence posts be?
Depth depends on local frost depth, post height, soil, wind load and local code. Dig the footing to the depth required for your location and fence type.
Should fence posts sit on gravel?
A compacted gravel base can improve drainage below the post. Confirm the detail with the post manufacturer and local requirements for your project.
How far apart should fence posts be?
The correct spacing depends on the fence material, panel dimensions, gate locations and wind load. Follow the manufacturer and local code requirements.
How long should concrete cure before adding fence panels?
Follow the concrete manufacturer instructions and allow the posts to remain braced until the concrete is strong enough to resist movement.